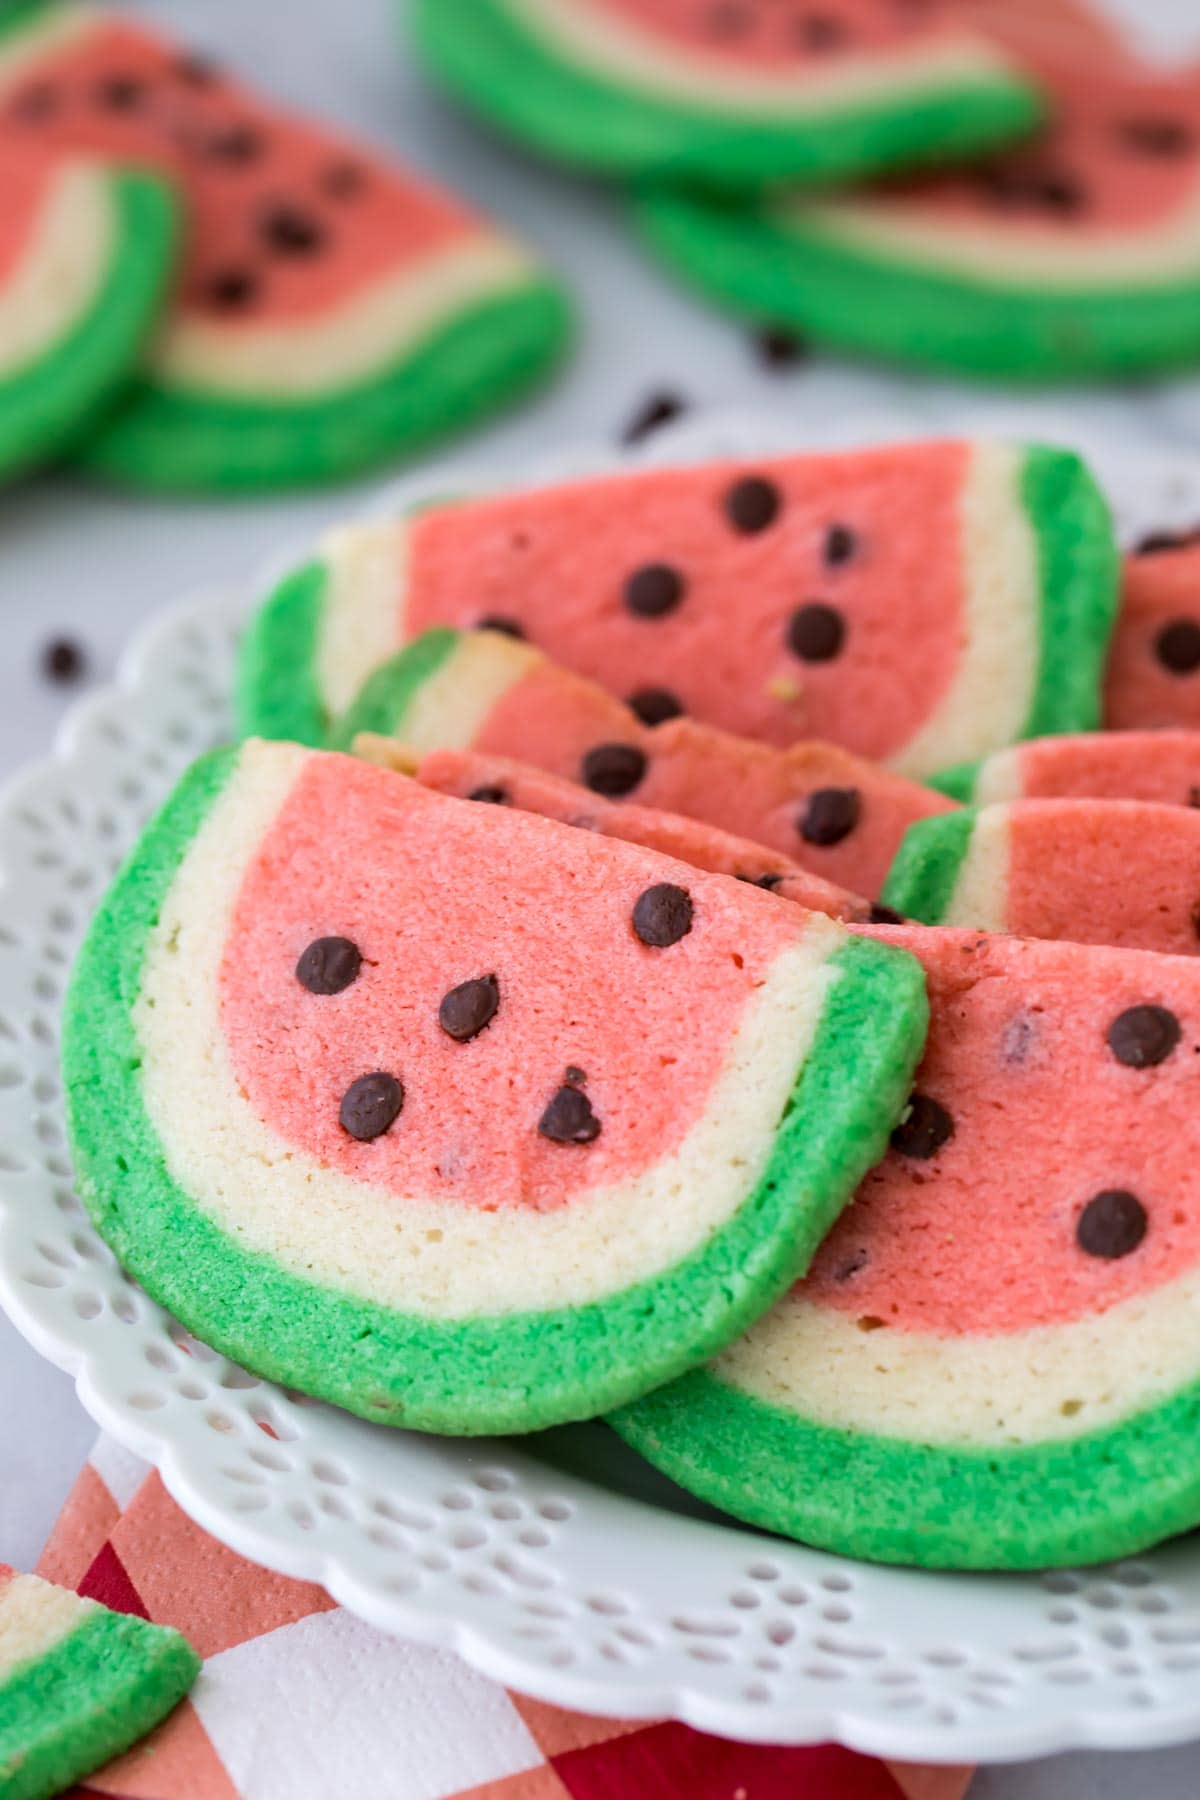
These pretty Watermelon Sugar Cookies are made completely from scratch using one homemade dough! I’ll walk you through the (surprisingly easy) process in my recipe below and have included plenty of step-by-step pictures as well as a how-to video!
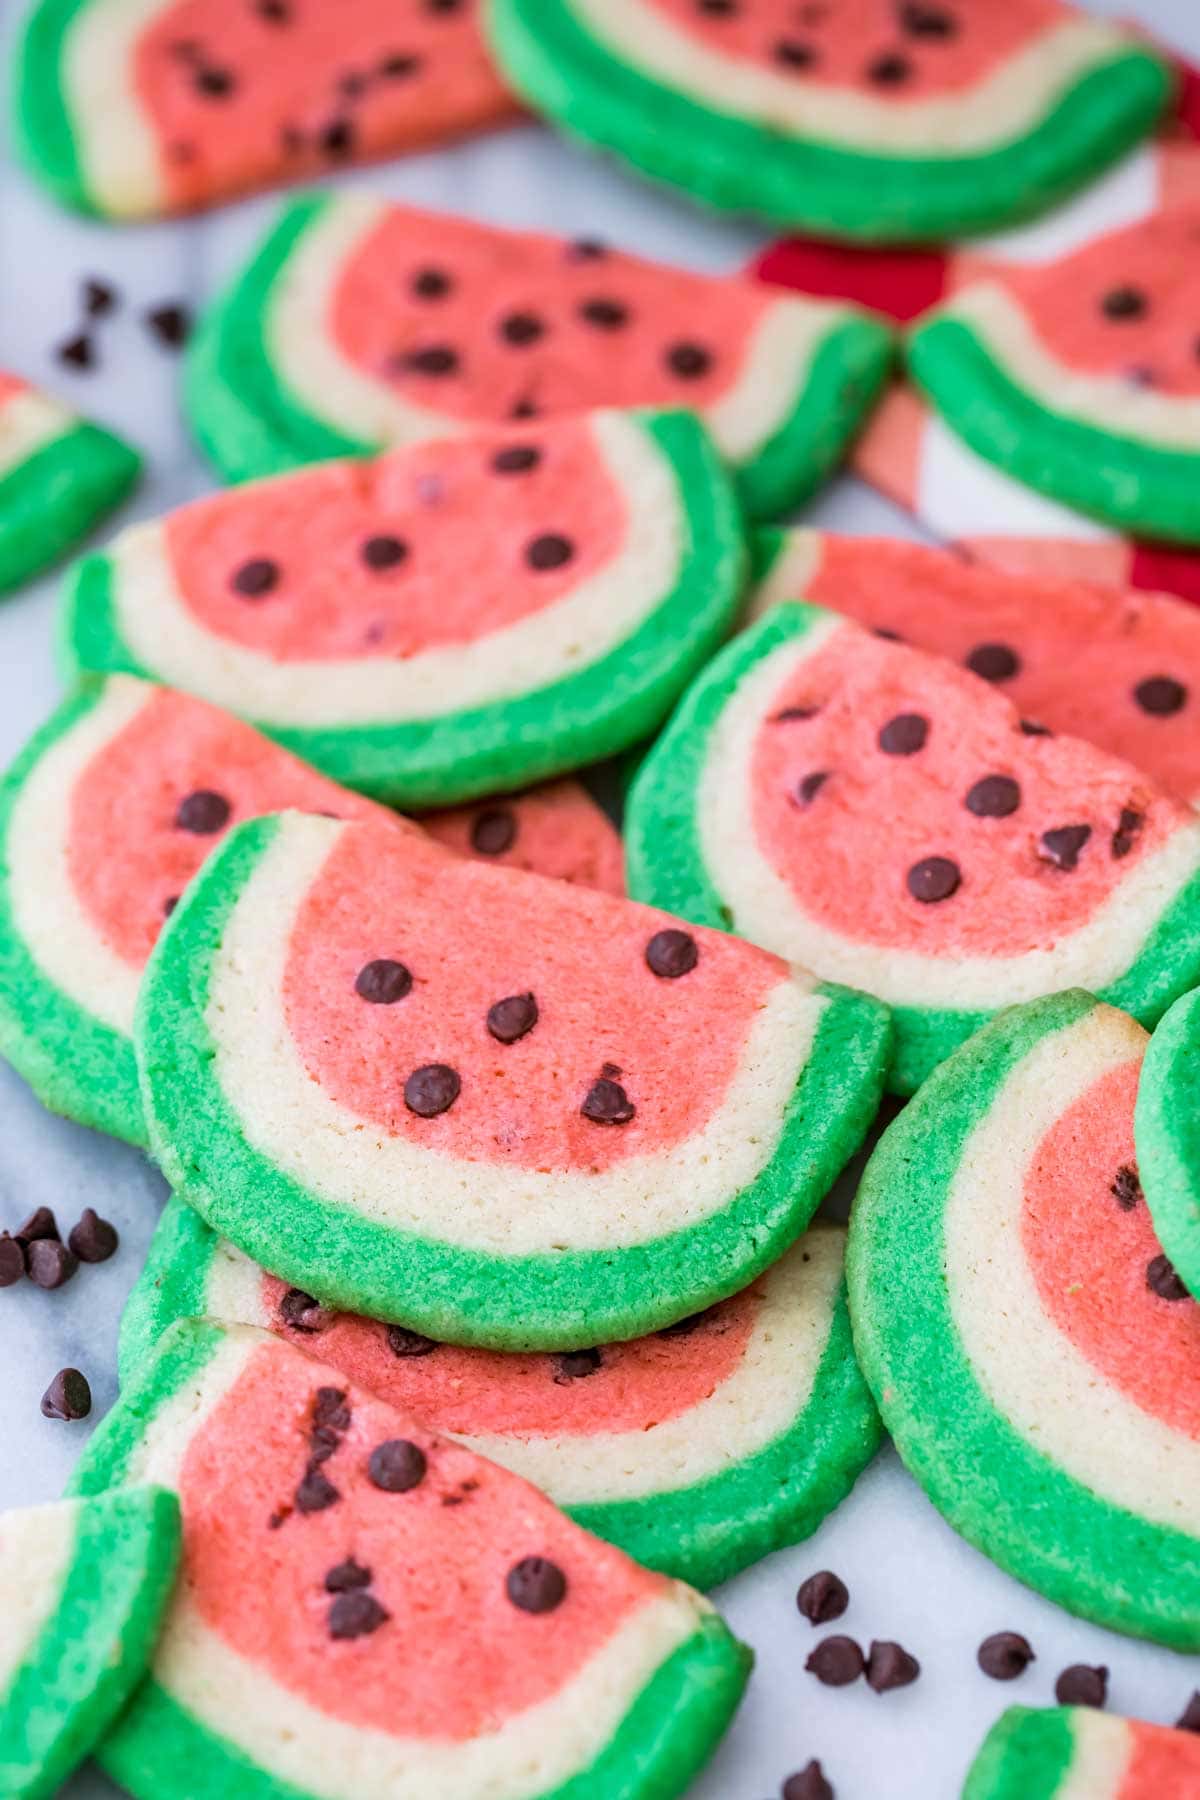
A Fun Summertime Cookie
When it comes to decorating sugar cookies, I’d usually rather not. I did it a few weekends ago for my sister’s bridal shower (maybe you caught a peek in my Instagram stories?)and, while I have a super simple royal icing recipe that makes things easier, I’m just not a great decorator and usually don’t want the trouble. Give me something easy and fuss-free, no cookie cutter required!
With all that being said, sometimes you just really, really want a cookie that’s not only delicious, but also cute. When I set out to make these summertime watermelon sugar cookies, I did so with every intention of making them as easy and uncomplicated as possible.
I won’t lie to you, they’re a bit more work than my drop sugar cookies, but I think the balance is definitely there and the work is worth it! You only need to make one dough, the chilling time is minimal, and there are no cookie cutters needed.
What You Need for Watermelon Sugar Cookies
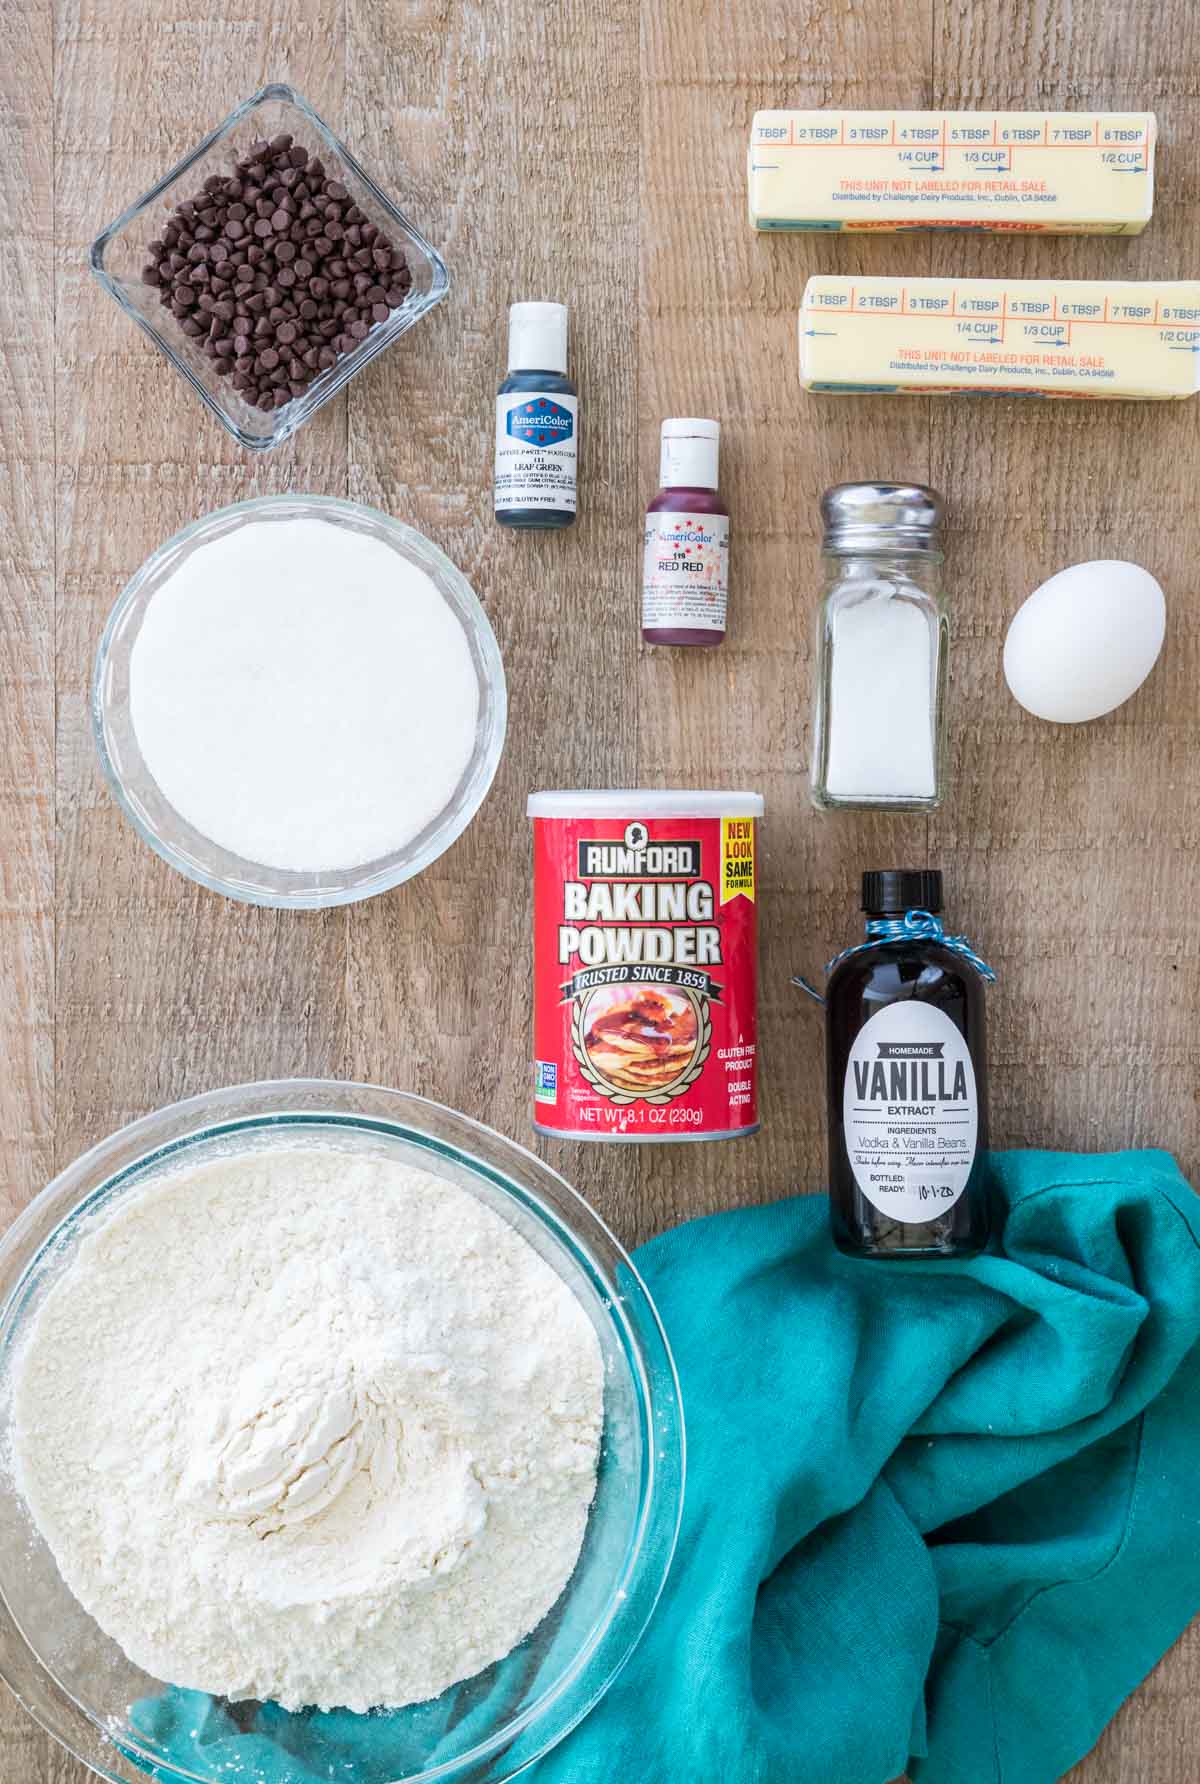
- Butter. Unsalted butter is preferred here, then we’ll add salt to best control the flavor. While your butter should be softened, it shouldn’t be so soft that it’s greasy or melty. Butter that’s too soft will make for a dough that’s unmanageable and cookies that flatten and spread too much in the oven.
- Sugar. We’re using granulated sugar only today.
- Egg. A single large egg is needed for today’s recipe.
- Vanilla extract. I’ve been wanting to experiment with watermelon flavoring, but these cookies still taste great with a classic vanilla flavor! If you haven’t already, make sure to check out my tutorial on how to make vanilla extract!
- All-purpose flour. I have only tested this recipe with all-purpose flour and do not recommend using any other type (particularly not self-rising flour).
- Baking powder. A little bit of baking powder helps the cookies to spread just enough and helps to make them slightly crisp.
- Food coloring. I highly, highly recommend using gel food coloring if you can get your hands on it. A little goes a long way and it colors the dough beautifully. Pink or red food coloring will work for the pink part of the watermelon (and I use red food coloring), but if you use red make sure to not go overboard and accidentally turn the dough red (though you’d need to use quite a bit!).
- Chocolate chips. These act as the watermelon “seeds”. I think they add the perfect finishing touch/detail, but you can leave these out for a “seedless watermelon” look. Alternatively you can use chocolate sprinkles!
This is just an overview of the ingredients that I use and why I use them. For the full recipe please scroll down to the bottom of the post!
How to Make Watermelon Sugar Cookies
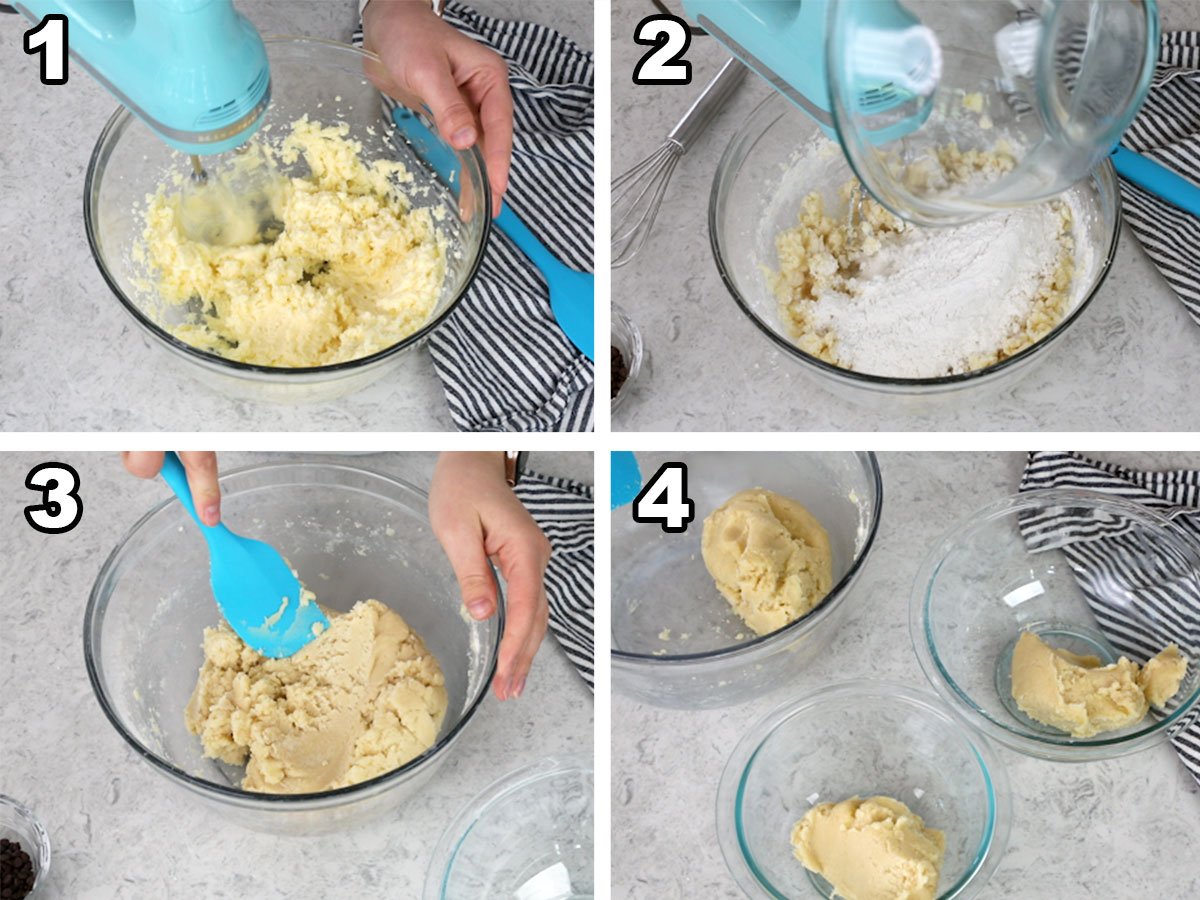
- Cream together butter, sugar, egg, and vanilla extract until well-combined.
- Whisk together your dry ingredients separately, then gradually add them to your dry ingredients while mixing.
- Stir until all of the flour has been combined and the dough is clinging together.
- Divide the dough in half and place one half in a bowl. Then, divide the remaining half into two parts, with one being slightly larger than the other. Each portion of dough should have its own bowl.
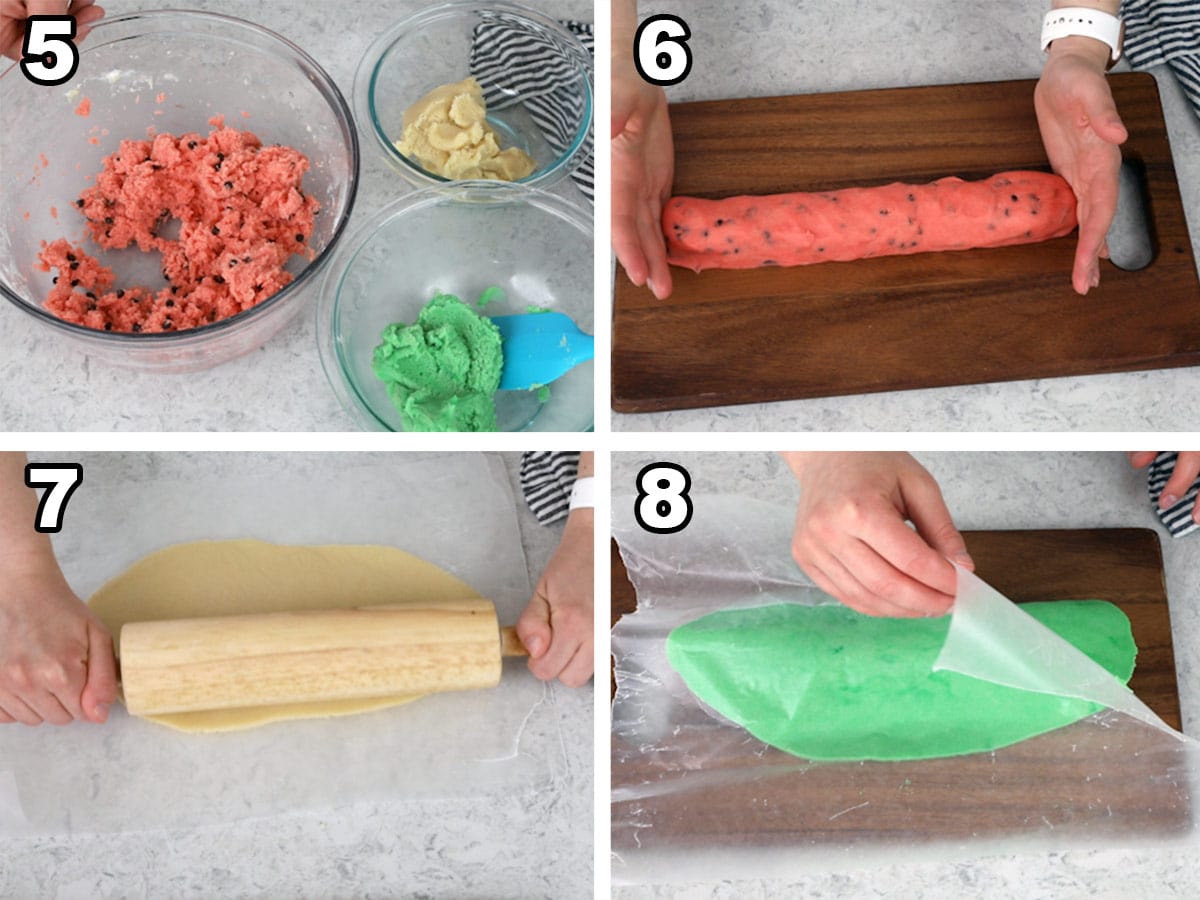
- Color the dough! The largest portion should be colored pink, and I also stir in a few mini chocolate chips at this point to act as the watermelon “seeds”. The second largest portion should be colored green for the watermelon “rind” and the third portion should not be colored.
- Form the pink portion of the dough into a log that’s 12″ long. The side facing the cutting board should be flattened and the outside should be rounded. When you cut into this dough, it should be a half-moon shape, so shape accordingly!
- Now take your un-colored dough and place it on a lightly floured surface or between two pieces of wax paper and roll with a rolling pin until it’s long enough and wide enough to cover the pink log that you created.
- Carefully layer the un-colored dough over the log so the pink is completely covered. Use a knife to trim any excess. Repeat the above step with the green dough, carefully placing that over the pink and white dough. Hint: wax paper makes it easy to transfer the dough!
SAM’S TIP: If the dough becomes too soft or sticky to manage at any point in the process, simply return it to the refrigerator to chill completely.
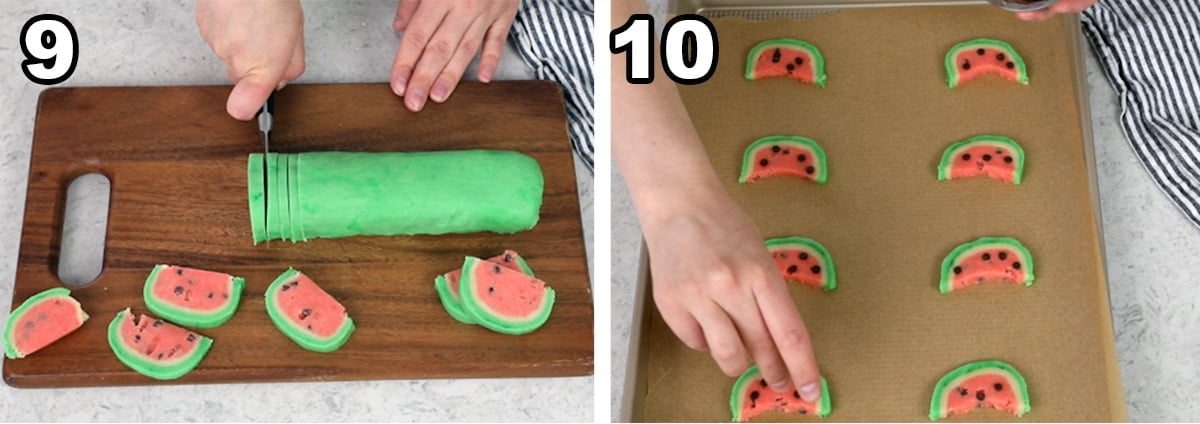
- Slice the dough! Form your watermelon slices by cutting the dough into ⅛″-¼″ thick slices.
- Use a knife to carve into the pink portion of the watermelon, making the shape concave. Since the dough will spread as it bakes, you don’t wan the pink portion to swell much higher than the rind, so carving into it (illustrated in the photo above) helps prevent that. If desired, press additional mini chocolate chips into the pink portion of the dough for distinct watermelon “seeds”.
Frequently Asked Questions
Yes, but keep in mind that liquid food coloring is not nearly as vibrant as the gel food coloring that I used, and you will likely need to use much more than I did in the video.
Yes! You can prepare and assemble the dough into the watermelon “log”, tightly wrap it (make sure you store it pink-side down so it stays properly shaped) and store in the refrigerator for one week. You may also freeze the dough (again, tightly wrapped) for several months. These cookies can be baked from frozen, but keep in mind they may need an extra few minutes in the oven.
More Recipes You Might Like:
Enjoy!
If you make this recipe, please leave me a comment and let me know what you think!

Watermelon Sugar Cookies
Ingredients
- 1 cup (226 g) unsalted butter softened
- 1 ½ cups (300 g) granulated sugar
- 1 large egg room temperature preferred
- 1 teaspoon vanilla extract
- 2 ½ cups (315 g) all-purpose flour
- ¾ teaspoon baking powder
- ¾ teaspoon salt
- Red or pink food coloring I use Americolor “red red” gel food coloring
- Green food coloring I used Americolor “leaf green” gel food coloring
- 4 Tablespoons mini chocolate chips divided
Recommended Equipment
Instructions
- Preheat oven to 375F (190C)
- Combine butter and granulated sugar in a large bowl and use an electric mixer to beat together until creamy and well-combined.1 cup (226 g) unsalted butter, 1 ½ cups (300 g) granulated sugar
- Add egg and vanilla extract and stir again.1 large egg, 1 teaspoon vanilla extract
- In a separate bowl, whisk together flour, baking powder, and salt.2 ½ cups (315 g) all-purpose flour, ¾ teaspoon baking powder, ¾ teaspoon salt
- Gradually add dry ingredients to wet ingredients (I like to do this in 3 or 4 parts) until the flour has been completely incorporated. This is a somewhat dry dough and may seem crumbly, but scrape the bottom of the bowl periodically and the dough will come together if you continue mixing (assuming you have measured your flour properly).
- Once dough is clinging together and all of the flour has been absorbed, divide it in half, placing each half in its own bowl. Then, working with one half, divide that dough almost in half again, allotting slightly more to one portion than the other.
- To the largest portion of dough, add red or pink food coloring and stir until you have a vibrant pink color (adding more food coloring as needed). Add 2 Tablespoons of mini chocolate chips and stir until combined. Set aside.Red or pink food coloring, 4 Tablespoons mini chocolate chips
- To the second largest portion of dough, add green food coloring (adding more coloring as needed) and stir until you have a vibrant green color. The third/smallest portion of dough should not be colored.Green food coloring
- Form the pink section of dough into a log that is about 12” long. Make it slightly wider than it is tall and round one wide end and flatten the other (if at any point the dough is too sticky to handle without difficulty, simply cover it and place in the refrigerator for 15-20 minutes before proceeding). Place the log flat-side down
- Take the un-colored dough and place it on a lightly floured surface or between two pieces of wax paper. Roll with a rolling pin until you have a rectangle that is large enough to cover the pink section. Carefully lift the dough it and use it to cover the rounded edge of the pink log (make sure this completely covers the pink section). Use a sharp knife to trim away any excess dough.
- Repeat step 8 with the green dough, making sure you roll it large enough to completely cover the pink and white dough. Cover the un-colored dough, then trim any excess dough as needed.
- Cover the surface of the dough with wax paper and chill in the refrigerator for at least 30 minutes before proceeding. While dough chills, preheat oven to 375F (190C).
- Remove dough from refrigerator and use a sharp knife to slice log into slices between ⅛-¼” thick. Place on a parchment paper lined baking sheet, spacing cookies at least 2” apart. Use a knife to carve slightly into the pink part of the cookie, making a slightly crescent shape (this is illustrated in the video and photos above).
- Press remaining chocolate chips point-down into the pink portion of the slices to make distinct watermelon “seeds”.
- Transfer to 375F (190C) preheated oven and bake for 9 minutes. Allow to cool completely on baking sheet before enjoying.
Notes
Storing
Store in an airtight container at room temperature for up to one week.Making dough in advance
The dough may be prepared and assembled up to one week in advance. Store it covered in the refrigerator and slice and bake as desired!Nutrition
Nutritional information is based on third-party calculations and should be considered an estimate only. Actual nutritional content will vary based upon brands used, measuring methods, cooking method, portion sizes, and more.



Judy
I have seen these cookies before, although never tried them. With your detailed instructions I thought I can do this, happy to say these cookies turned out wonderful! A big hit with the family, they thought I bought them from a bakery. Thanks for sharing Sam!! ❤️
Sam
That’s so great to hear, Judy! I’m so glad everyone enjoyed them so much! 🙂
Amanda
Fun and easy recipe, the kids loved them. The cookies were so adorable and delicious. The only note that I made was to change the temp to 350 degrees as the bottom of my cookies browned on the first batch but I do think my oven gets too hot. I did buy the color gel and found it much easier to use than the liquid. Great recipe!
Sam
I’m so glad you enjoyed them, Amanda! I do love using the gels so much! 🙂
Steven Zakon-Anderson
I wonder if you have a thought on one difference in my results. The cookies in your pictures are so perfectly smooth and flat, at least on the side we see in the picture. While mine came out good, and were a hit at the party I brought them to, I can not say they looked like yours. They were perfectly smooth when I cut them and put them on the sheet pan, but not so uniformly perfect when they came out of the oven and cooled. They were more irregular on top, and a bit bumpy compared to the ones in your picture. Perhaps mine rose more in the oven than yours did? Baked too long? Cut back on the baking powder perhaps? Any thoughts would be appreciated.
Sam
Hmmm that’s very odd. I’ve never encountered this issue. You could definitely try cutting the baking powder if they rose too much, but you really shouldn’t have to. I’m not sure what could be causing this. 🙁
Steven Zakon-Anderson
Another winner! Thanks for the fun recipe and, as always, the clear directions. I did switch the order of one step. When I pushed more chips into the cut cookies just before baking, the dough pushed out slightly since they were softening in the warm kitchen. This sort of undid the cut I had made in the dough. So I pushed the chips into the red part of the cookie first, and then I cut the concave piece out.
Sam
I’m so glad you enjoyed them so much! These cookies are so much fun to make. 🙂
Kathleen A Burke
I made these for our neighborhood get-together yesterday and they were a BIG hit! Nobody believed I made them!
Sam
That’s awesome! I’m so glad everyone enjoyed them so much, Kathleen! 🙂
Leann
Mine spread horribly and look gritty, what can I do before baking the next round?
Sam
Hi Leann! It sounds like too much sugar was accidentally used, or if the dough was very, very warm this could happen.
Leanne
Hey Sam,
I love these cookies. I am happy that I watched the video though because the written directions don’t say anything about chilling the dough before you slice it. That makes a big difference.
Sam
Hi Leanne! You’re absolutely right, it looks like somehow I accidentally deleted that from the recipe. Thank you so much for bringing this to my attention, it’s been fixed now. I am so glad you like the cookies!
Amy
Just came out of the oven – delicious and so cute! Perfect summer cookie recipe!
Sam
I’m so glad you enjoyed them, Amy! 🙂
Andi
These cookies were easy to make and I liked your tip about adding chocolate chips after the cookies were formed. They were delicious.
I learn a lot from your videos and I’m an experienced cook and baker of 40 years. Thank you for all your wonderful recipes.
Sam
I’m so glad you enjoyed them so much, Andi! 🙂
Annabel
This is funny because I actually have some of your cut out sugar cookie dough recipe in my freezer, I never used all of it! Do you think if I did this with that remaining dough, and still chilled it and everything, it would turn out? The watermelons are just too cute and perfect for summer! 🍉☀️
Sam
Hmm I think the sugar cookie dough will work. Good luck! 🙂