Learn how to make homemade hand pies with a buttery, flaky (and super easy!) from-scratch pie crust and a juicy berry or apple filling! Recipe includes a how-to video!
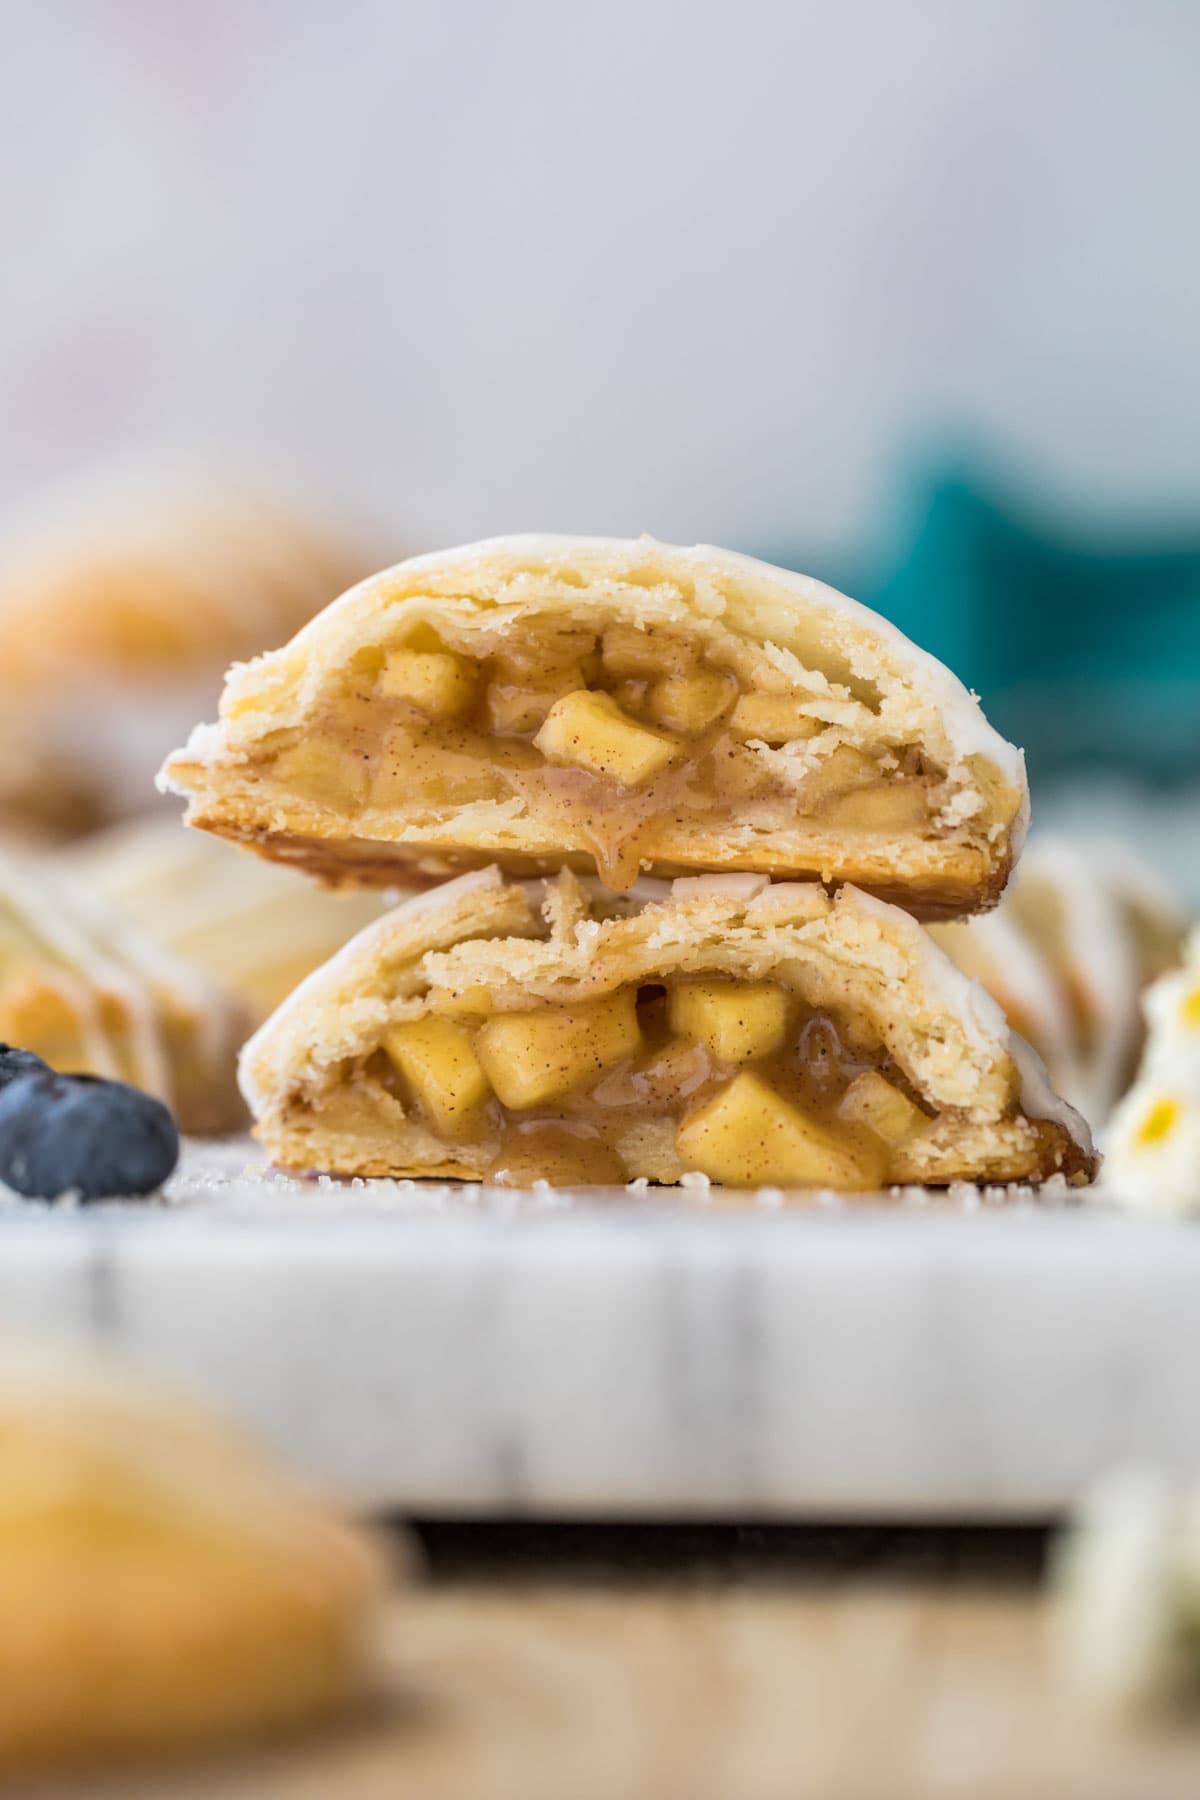
Mini, Three-Bite Pies
Today’s recipe is the perfect way to use up fresh summer berries, hand-picked fall apples, or whatever frozen fruit you happen to have languishing in your freezer. With my buttery, flaky, completely from-scratch pie crust, I strongly feel that hand pies are even better than regular pie recipes thanks to their higher ratio of crust to filling.
This recipe is quite similar to my apple turnovers and strawberry pop tarts, only differently shaped. We’re using my foolproof homemade pie crust and I have instructions for using berries, peaches, or apples, so I think I covered all the bases with all of the best pie-filling-fruits.
I’m walking you through all of the steps with plenty of details, tips, photos, and a how-to video, so let’s get to it!
Ingredients

There are two main components to today’s hand pie recipe: the crust and the filling. Let’s cover the crust first:
- Flour. Use all-purpose flour for best results.
- Butter. Use unsalted butter and make sure it’s very cold, the colder the better and the more flaky your resulting pie crust will be. I like to place mine in the freezer 15-20 minutes before I begin to prepare my crust.
- A pinch of sugar and salt add flavor to the crust, since the crust such a significant part of the hand pies you want to make sure it tastes good!
- Sour cream. This is my secret ingredient for a super easy, flaky, flavorful, and almost foolproof crust. No messing around with vodka or various amounts of ice water, my recipe lists exact amounts and perfect, flaky crust every time.
Next is the fruit filling. I’ve included instructions in the printable recipe to make either a berry or peach filling or an apple filling. Since apples have a different, more crisp texture and are less juicy they necessitated a slightly different cooking method for best results. With both recipes you need:
- Fruit! For the apple filling, peel, core, and chop your apples. Keep the pieces tiny so they become tender while cooking and so they fit neatly into the hand pies. For the berry filling, use your favorite berries! If you’re using large berries (are your strawberries exceptionally monstrous?) you can chop them before cooking so they’ll neatly fit in the hand pies.
- Butter. A small bit of butter adds richness and a smooth mouthfeel to the hand pie filling. For the apple filling, the apples are cooked in the butter (you’re going to love how this smells!), while with the berry filling it is a finishing touch stirred in at the end.
- Cornstarch. This thickens the filling, you need a bit more with the juicy berry filling and less with the less-juicy apples.
- Sugar. Brown sugar beautifully complements the apple filling but would bully the berries, so we stick with granulated for that recipe.
You’ll also need an egg to make an egg wash to brush the dough (if you’re egg-free you can skip this, but it makes a slightly crisper and more golden crust) and a bit of powdered sugar, vanilla, and milk if you’d like to make my simple vanilla glaze for drizzling on top.
How to Make Hand Pie Dough

The first step to making perfect homemade hand pies is making the perfect homemade pie dough! Mine is easy (and if you’ve been hanging around here a while or ever made my blueberry pie or lattice pie crust, you’ve already made it once or twice!).
- Combine flour, sugar, and salt in a food processor and then cut your butter into pieces and scatter it overtop. Pulse with the food processor until the butter is cut into the mixture and it resembles coarse crumbs (it’s fine/desirable if you still have some chocolate-chip-sized, discernible pieces of butter remaining in the dough!).
- Add sour cream and pulse dough just until it begins to cling together and no discernible dry flour remains.
- Divide dough into two parts and form each into a disk. Chill for at least 30-60 minutes and up to 3 days (while it’s chilling, can prepare your filling)
- Once dough is chilled, work with one disk at a time and roll it out to be ¼″ thick. Use a cookie cutter to cut into 3″ circles. If your filling isn’t ready at this point, store these in the fridge until ready to assemble.
SAM’S TIP: If you don’t have a food processor, this dough can be made with a grater or pastry cutter! Combine flour/sugar/salt in a bowl. Use a grater to grate the butter into the mixture or use a pastry cutter to cut it in. Then stir in the sour cream and proceed with the recipe as written. Note that this technique requires bit more manual effort, take care that the dough doesn’t become too warm!
How to Make Hand Pie Filling
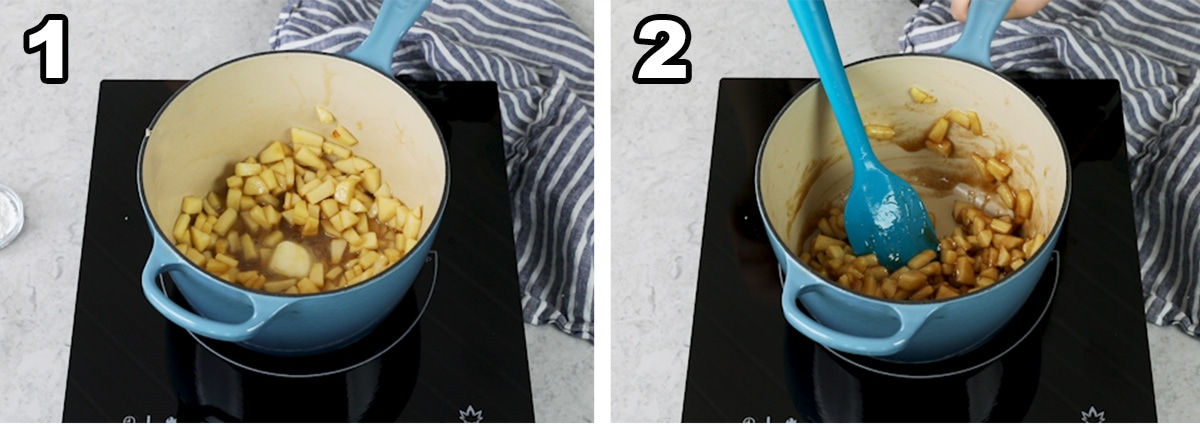
While I walk through both the berry filling and the apple filling in the printable recipe below, I just covered the apple hand pie filling in the video. To make this filling:
- Combine apples, sugar, and butter and cook over medium heat until butter is melted.
- Add cornstarch, cinnamon, and salt and continue to cook (stirring regularly!) until the mixture has thickened.
Once the mixture thickens, remove it from the heat, add a splash of vanilla (for apple hand pies only — vanilla complements the apples but overwhelms the flavor of the berries) and allow to cool completely before proceeding. You can speed up the cooling process by placing the filling in the fridge.
How to Assemble Hand Pies
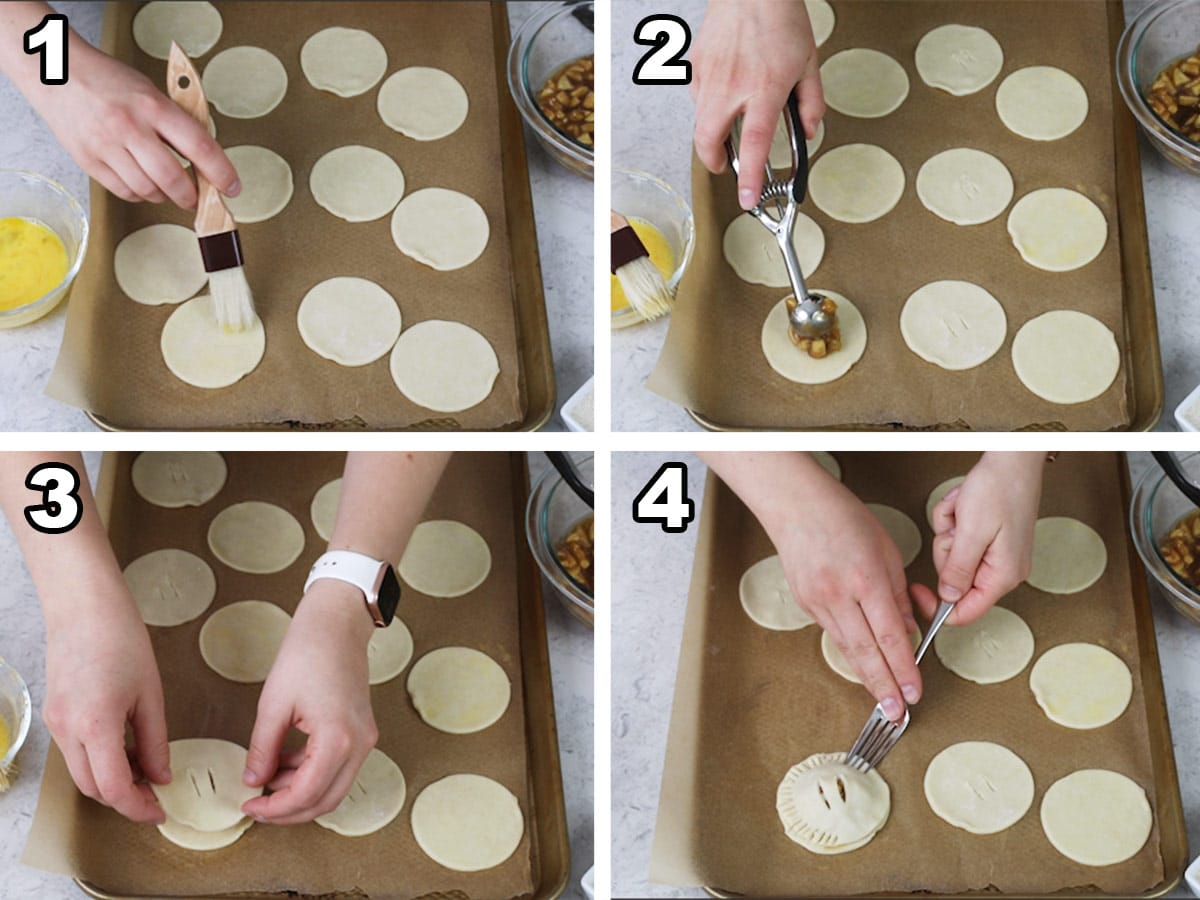
- Brush one cut-out circle of dough lightly with egg wash (this helps prevent it from becoming soggy in the oven).
- Scoop a rounded tablespoon of filling right into the center of the egg-wash-brushed circle.
- Cut two small slits in another circle of dough (these will be your vents to help keep the filling from spilling out) and place this over the filling.
- Using the tines of a fork, go around the perimeter of the hand pies, crimping them to hold the filling inside. Brush the surface with egg wash and, if you’d like, sprinkle with granulated sugar.
If your dough becomes soft or difficult to manage at any point, you’ll want to pop it back in the fridge or even the freezer before baking. If making these on a hot day, it’s not a bad idea to freeze or refrigerate the assembled hand pies for 15-20 minutes before baking, just to ensure everything is as cold as possible!

Frequently Asked Questions
While I personally advise against it as the flavor will suffer, yes, store-bought pie crust or puff pastry could be used. No other alterations will need to be made. If you’re really craving puff pastry, keep in mind that you could use a double-batch of my homemade puff pastry!
Brushing the dough with egg wash, making sure the pie dough stays as cold as possible, making sure that the filling is completely cooled before spooning it over the crust, and baking on a high temperature are all critical to ensuring a crisp hand pie that doesn’t become soggy. However, the filling is still liquid and after 24-48 hours it will begin to soften the crust, even if you followed all of the steps perfectly.
These can be stored at room temperature (I recommend covering them) for up to 2 days. They’ll keep 3-4 days when refrigerated, but the sooner you enjoy them the better the quality will be!

Enjoy!
More Recipes You Might Like
Let’s bake together! I’ll be walking you through all the steps in my written recipe and video below! If you try this recipe, be sure to tag me on Instagram, and you can also find me on YouTube and Facebook
Hand Pies
Ingredients
Crust
- 2 cups (250 g) all-purpose flour
- 4 teaspoons granulated sugar
- ½ teaspoon salt
- 12 Tablespoons (170 g) unsalted butter very cold and cut into pieces
- ½ cup (120 g) full-fat sour cream
Berry or peach filling (note, this recipe makes enough crust for you to make EITHER the berry/peach filling OR the apple pie filling, not both).
- ⅓ cup (66 g) granulated sugar
- 2 Tablespoons cornstarch
- 8 oz (226 g) fresh or frozen berries or peeled, pitted, diced peaches
- 2 Tablespoons water
- 1 Tablespoon lemon juice
- 1 Tablespoon unsalted butter
Apple pie filling (note, this recipe makes enough crust for you to make EITHER the berry/peach filling OR the apple pie filling, not both).
- 8 oz (226 g) peeled cored apples that have been diced into very small pieces (½” or smaller). (weigh after peeling and coring). This is about 2 medium-sized apples.
- ⅓ cup (65 g) light brown sugar firmly packed
- 2 Tablespoons (42 g) unsalted butter
- 2 teaspoons cornstarch
- ½ teaspoon ground cinnamon
- ⅛ teaspoon salt
- ½ teaspoon vanilla extract
For Assembly
- 1 large egg
- 1 teaspoon water
- Coarse or granulated sugar for sprinkling optional
Glaze (optional, alternatively sprinkle with granulated sugar before baking or dust with powdered sugar before serving).
- 1 cup (125 g) powdered sugar
- 1 Tablespoon milk
- ½ teaspoon vanilla extract
Recommended Equipment
- 3” (7.5cm) round cookie cutter (see note)
Instructions
Crust
- Combine flour, sugar, and salt in the basin of a food processor (see note if you don’t have a food processor) and pulse briefly to combine.2 cups (250 g) all-purpose flour, 4 teaspoons granulated sugar, ½ teaspoon salt
- Scatter butter over the surface of the flour ingredients, then pulse again until butter is incorporated and mixture resembles coarse crumbs.12 Tablespoons (170 g) unsalted butter
- Add sour cream and pulse again until mixture begins to clump together.½ cup (120 g) full-fat sour cream
- Divide dough into two even parts and form each into a ball. Flatten into a disc and wrap in plastic wrap. Chill in the refrigerator for at least 30-60 minutes before proceeding. While the dough chills, you can prepare your filling.
If Making Berry or Peach Filling:
- To make berry filling, whisk together sugar and cornstarch in a small saucepan.⅓ cup (66 g) granulated sugar, 2 Tablespoons cornstarch
- Add berries (or peaches), water, and lemon juice and stir until combined.8 oz (226 g) fresh or frozen berries or peeled, pitted, diced peaches, 2 Tablespoons water, 1 Tablespoon lemon juice
- Transfer saucepan to stovetop and turn heat to medium. Cook, stirring almost constantly, until the berries release their juices and the mixture begins to bubble. This will take several minutes. If you are using large berries like big strawberries, you may wish to use a potato masher to break up and mash the berries so they fit in the pie crust better.
- Continue to stir while the mixture bubbles until it thickens and your spoon or whisk leaves trails through the mixture. It should be approaching a jam-like consistency, but keep in mind that the filling will thicken as it cools so it should still be a bit loose when it is finished.
- Once filling is thickening, remove from the stovetop and transfer to a heatproof bowl.
- Stir in butter. Allow mixture to cool completely before filling hand pies (you may speed this up by placing it in the refrigerator).1 Tablespoon unsalted butter
If Making Apple Filling:
- Prepare your apple filling by combining apple pieces, brown sugar, and butter in a medium-sized saucepan over medium-low heat.8 oz (226 g) peeled, ⅓ cup (65 g) light brown sugar, 2 Tablespoons (42 g) unsalted butter
- Stir frequently until butter is melted, then add cornstarch, ground cinnamon and salt.2 teaspoons cornstarch, ½ teaspoon ground cinnamon, ⅛ teaspoon salt
- Increase heat to medium and bring to a simmer. Simmer mixture, stirring frequently, until it begins to thicken.
- Remove from heat and stir in vanilla extract. Allow mixture to cool completely before proceeding (you may speed this up by placing it in the refrigerator).½ teaspoon vanilla extract
Assembly
- Preheat oven to 400F (205C) and prepare an egg wash by whisking together egg and water. Set aside.1 large egg, 1 teaspoon water
- Remove one disk of pie crust from the refrigerator, unwrap, and transfer to a clean, lightly floured surface.
- Use a rolling pin to roll dough to be ¼” (0.6cm) thick. Use 3” round cookie cutter to cut dough into circles, keeping cuts close to get as many as possible out of the dough (don’t be afraid to add as much flour as is needed, and if at any point the dough becomes too sticky to manage, return it to the fridge).
- Place two circle on a parchment paper-lined baking sheet (one will be the bottom half and one the top). Lightly brush the entire surface of one of the dough circles with egg wash. Use a sharp knife to cut two small slits/vents in the other dough circle.
- Place a rounded tablespoon of filling in the center of the egg-wash brushed circle.
- Take your other circle (with the vents cut in it) and place this over the top of the filling. Use a fork to crimp the edges to seal the filling in the crust. Brush the surface with egg wash and, if desired, sprinkle liberally with coarse sugar.Coarse or granulated sugar for sprinkling
- Repeat steps above (rolling out the second disk of dough once you have used all of the first), spacing hand pies at least 2” apart on baking sheet, until you have fit as many as you can on the baking sheet.
- Transfer to 400F (205C) oven and bake for 15 minutes or pies are beginning to turn golden brown. Allow to cool on baking sheet before enjoying. See instructions below if you would like to add glaze topping.
Glaze (optional)
- If using glaze, whisk together sugar, milk, and vanilla extract until smooth. If mixture is too thick, add a splash more milk until it falls off the whisk in a ribbon and holds its shape for several seconds before dissolving back into the bowl.1 cup (125 g) powdered sugar, 1 Tablespoon milk, ½ teaspoon vanilla extract
- Drizzle over hand pies and allow glaze to set before serving.
Notes
Food processor note:
If you do not have a food processor, instead simply combine your dry ingredients then use a pastry cutter to cut the butter into the flour mixture (or use a grater to grate the butter into the flour mixture) and then stir in the sour cream until cohesive.Cookie cutter note:
I found that a 3” round cutter was the perfect size for these handheld pies. If you don’t have one, check your cabinets for a glass or bowl that is this width. Alternatively, you can cut the dough into 3” squares or rectangles instead.Storing
Store in an airtight container at room temperature for up to 48 hours or in an airtight container in the refrigerator for 3-4 days. Note that hand pies are best enjoyed fresh.Nutrition
Nutritional information is based on third-party calculations and should be considered an estimate only. Actual nutritional content will vary based upon brands used, measuring methods, cooking method, portion sizes, and more.



annemarie
can I make the apple filling the night before and store in air tight container
make pies in the am
Sam
Yes that would be fine, enjoy!
Dianne Mcphearson
I haven’t made this yet. But I have made a copy of the recipe. I plan to use these in my Christmas baskets that I make every year. I’m always looking for something different to put in them. This seems like the Grandis recipe. Thank you so
Sam
You’re welcome! I hope you love them! 🙂
Miriam Rose Blanar
Hi Sam, do you think it would work to make these pies with the peaches and cream filling from your galettes?
Sam
Hi Miriam! There is a potential that the filling could leak out a little bit, but I haven’t tried it myself. If you do I would love to know how it goes. 🙂
Miriam Rose Blanar
I actually did not do it with the cream cheese, I just did the peach and blueberry fillings, and it was amazing!
Lesley
Absolutely love this recipe! They turn out great every time I make them! They are to die for delicious! Thanks very much for this amazing recipe!❤
Melody
So do you think I could assemble these at night and then bake in the AM? If so when would you add the course sugar? Would you freeze or refrigerate them?
Thanks for any advice. I have to drive out of town with them for a shower but would really like to bake the day of and have to head out early so any prep ahead will be so helpful!
Melody
Emily @ Sugar Spun Run
Hi Melody! We haven’t tried this ourselves, so we can’t say how well this would work. We’d be afraid that they’d become too soggy in the fridge, but the freezer may work. We’d add the sugar right before baking. If you do try it, will you let us know how they turn out?
Geni
I used puff pastry and they were fresh flaky and crisp. I did store in an airtight container in refrigerator. When snacking the next day, I popped them in the toaster oven for about 3 minutes on high. They were like fresh, warm yet crispy.
Exie Silva
Sam, do these freeze well after cooking them? I’d love to make several batches at once, and freeze them, if family doesn’t devour them asap. I made one batch and they were gone that day, and there’s only four of us. Thanks for this great easy recipe.
Sam
I don’t believe you will have any issues freezing these. 🙂
tootie
Could you use this recipe for making Raisin Field Cookies for the dough.
Sam
Hi Tootie! Unfortunately I’m not familiar with Raisin Field cookies so I’m really not sure!
Veronica
don’t you need any shortening for the crust? And what if I don’t have sour cream for the crust?
Sam
Hi Veronica! Just butter in the crust. If you don’t have sour cream you can substitute full fat greek yogurt. 🙂
Theresa
Do you have a A recipe for chocolate pudding that you could put inside the pie?
Hostess chocolate pies are my kids favorite?
Sam
Hi Theresa! I do have a chocolate pudding recipe, but I would be worried about it leaking out. A chocolate ganache might work, but I haven’t tried it myself. 🙂
Janet Miller
Sam, I was hoping to substitute shortening for the sour cream/yogurt in this recipe. Do you think it would work? Thanks!
Sam
Hi Janet! I’m not sure how it would work so I’m hesitant to say. I’m not sure they would turn out great. 🙁
Glad Caldwell
Thanks for sharing. What is the brand of food processor did you use?
Sam
Hamilton Beach 🙂 I linked to it in the “Recommended Equipment” section of the recipe.
Susan
Quick question…
Can I use pie filling instead of making my own?
Sam
I suppose you could.
Diane
First time making hand pies and I definitely picked the right recipe! The crust was quick to make in the food processor, easy to roll, and it was tender, flaky, and delicious. I made a double batch, as I wanted extra to share on Pi Day. Only change I made on the second batch was to portion the dough into 2.2 oz disks and roll them into 6” circles to make a little larger pie and avoid wasting dough and having to re-roll dough scraps. Used 2-3 Tbsp of filling and folded the dough over to make a half moon shaped pie. I got 9 large pies out of a batch of dough this way. The pies were beautiful and oh so tasty. Thanks for a great recipe!
Sam
I’m so glad you enjoyed them so much, Diane! 🙂